Pan Fried & Skillet Chicken Breast: The Ultimate Guide
Welcome to our comprehensive guide on mastering the art of the skillet chicken breast. From achieving perfectly juicy results to creating restaurant-quality pan sauces, this resource will transform how you approach this versatile protein.
The Pan-Frying Paradox: Why Chicken Breasts Need Special Attention
Pan frying chicken breasts represents one of cooking’s most delicious contradictions. On one hand, chicken breast is America’s most consumed protein—affordable, versatile, and theoretically simple. On the other hand, it’s notoriously unforgiving and the source of countless kitchen disappointments.
The fundamental challenge lies in chicken breast’s unique structure. Unlike fattier cuts that self-baste during cooking, chicken breasts are remarkably lean, containing less than 3% fat. This leanness creates a narrow window between perfectly cooked and disappointingly dry. Add to this their uneven shape—thicker in the middle, tapered at the edges—and you have a protein that cooks unevenly in a hot skillet.
Traditional advice often falls short: “Cook until no longer pink” virtually guarantees overcooking, while high heat without proper technique leads to the dreaded combination of charred exteriors and raw centers. The stakes are high; overcook by just 5-10 degrees, and you’ve transformed a succulent protein into something resembling a textured eraser.
Pan frying solves these challenges through precise heat management and technique. Unlike other methods, skillet cooking gives you complete control over heat application, allowing for the crucial sear that develops flavor while creating a moisture-sealing barrier. The direct contact with the cooking surface ensures efficient heat transfer, reducing cooking time and moisture loss. Perhaps most importantly, the pan-frying method uniquely enables the creation of pan sauces—transforming the concentrated fond (those caramelized bits left in the pan) into silky, flavor-packed sauces that both complement and rehydrate the chicken.
This guide breaks down the science and technique behind perfect pan-fried chicken breasts, turning potential kitchen frustration into consistent culinary success.
The Pan-Fried Chicken Masterclass
The Science Behind Successful Skillet Chicken
Mastering pan-fried chicken requires understanding the transformative processes happening in your skillet. The perfect result relies on three key scientific principles:
- The Maillard Reaction: This complex chemical reaction between amino acids and reducing sugars occurs at temperatures between 280-330°F, creating hundreds of new flavor compounds. In chicken, proper browning can generate up to 600 new flavor molecules, transforming a bland breast into something deeply savory.
- Protein Denaturation: As chicken cooks, its protein structures unwind and reform, dramatically changing texture. At around 145°F, the proteins begin contracting, and by 165°F, they’ve significantly tightened, potentially squeezing out moisture. The goal is to control this process, allowing just enough contraction for food safety while preventing excessive tightening.
- Carryover Cooking: Perhaps the most overlooked phenomenon, carryover cooking refers to temperature increases after removing chicken from heat. A chicken breast’s internal temperature typically rises 5-10°F during resting due to residual heat from the exterior migrating inward. Failing to account for this almost guarantees overcooking.
Understanding these principles transforms pan-frying from a guessing game to a controlled, predictable process.
The Universal Pan-Fried Chicken Method
This foundational technique works across recipes and can be adapted for various flavor profiles:
- Preparation:
– Bring chicken breasts to room temperature (20-30 minutes on counter)
– Pat completely dry with paper towels
– Season generously with salt and pepper (or desired spices)
– If breasts are over 1-inch thick at any point, butterfly or pound to even thickness - The Initial Sear:
– Heat skillet over medium-high heat until hot but not smoking
– Add 1-2 tablespoons of high smoke-point oil (grapeseed, avocado, etc.)
– Place chicken presentation-side down, avoiding overcrowding
– Don’t disturb for 3-4 minutes to develop proper crust - The Flip and Finish:
– Turn chicken only once when properly browned
– Reduce heat to medium
– For thicker breasts: Add 1-2 tablespoons butter to baste
– Cook until internal temperature reaches 160°F (carryover cooking will bring to 165°F) - The Critical Rest:
– Transfer chicken to plate or cutting board
– Tent loosely with foil
– Rest minimum 5 minutes, up to 10 for larger breasts
– Use residual pan fond for sauce creation (optional)
The magic of this method lies in its temperature management—starting with higher heat for proper browning, then moderating to allow even cooking without drying out the protein.
Essential Equipment: The Tools Behind Perfect Results
The right equipment makes the difference between mediocre and magnificent results:
Heavy-Bottomed Skillet
Why it matters: Provides even heat distribution and superior heat retention. Thin skillets create hot spots that burn chicken while leaving other areas undercooked. A 10-12 inch skillet gives adequate surface area for proper browning without crowding.
Instant-Read Thermometer
Why it matters: Eliminates guesswork and ensures food safety without overcooking. The difference between perfectly juicy (165°F) and disappointingly dry (175°F+) is slim. Visual cues are unreliable; temperature is definitive.
Kitchen Tongs
Why it matters: Allows precise handling and turning of chicken without puncturing, keeping precious juices intact. Forks or spatulas can damage the meat’s structure, leading to moisture loss.
Meat Mallet/Tenderizer
Why it matters: Ensures even thickness throughout the breast, solving the fundamental problem of uneven cooking. Without even thickness, you’re forced to choose between overcooked edges or undercooked centers.
Splatter Screen
Why it matters: Reduces cleanup while allowing steam to escape. Trapping too much steam prevents proper browning and creates a “steamed” rather than pan-fried texture.
Comprehensive Timing & Temperature Chart
|
Chicken Cut |
Initial Sear (per side) |
Finish Time |
Target Temp |
Total Active Cook Time |
Rest Time |
|
Standard Breast (3/4″ thick) |
3-4 min |
3-4 min |
160°F |
6-8 min |
5 min |
|
Thick Breast (1″+) |
4-5 min |
5-7 min |
160°F |
9-12 min |
8-10 min |
|
Butterflied Breast |
2-3 min |
2-3 min |
160°F |
4-6 min |
5 min |
|
Cutlets (1/4″-1/2″) |
2 min |
1-2 min |
155°F* |
3-4 min |
3 min |
|
Tenderloins |
2 min |
1-2 min |
155°F* |
3-4 min |
3 min |
Note: Thinner cuts have less carryover cooking, requiring slightly lower pull temperatures
Signature Techniques: The Skillet Chicken Showcase
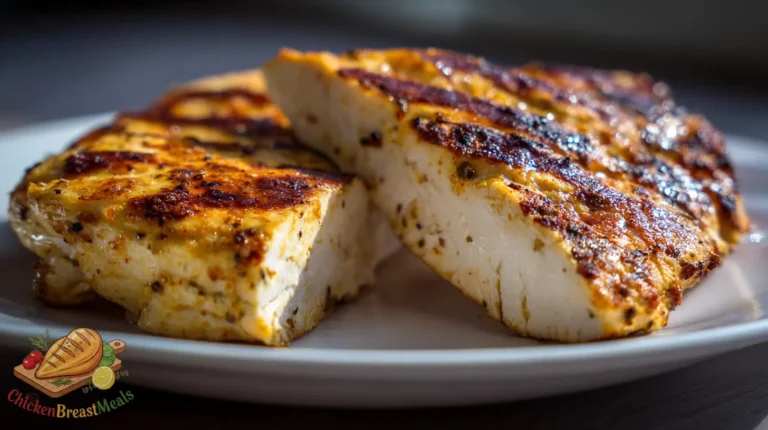
Pan Fried Boneless Chicken Breast: Mastering Moisture Retention
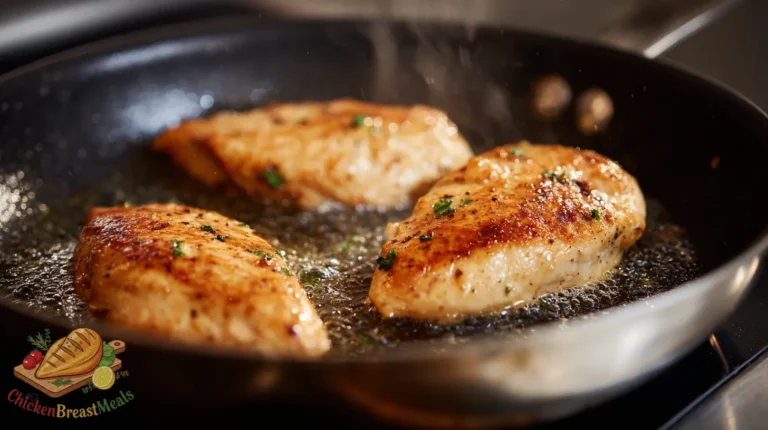
The standard pan-fried chicken breast demands precision to avoid the dreaded “rubber chicken” texture that results from improper heat management. The secret lies in creating a moisture-sealing sear in the first 3-4 minutes, then moderating heat to prevent the rapid contraction of proteins that squeezes out juices. Professional kitchens often employ a “7-3 method”—spending 70% of cooking time on the first side at higher heat, then finishing the remaining 30% at reduced heat. This asymmetrical approach creates the ideal combination of flavorful exterior and juicy interior, preventing the disappointing rubbery result that comes from uniform cooking temperatures.
PRO TIP: For everyday pan-fried chicken, add a tablespoon of butter and a few sprigs of thyme to the pan after flipping. Tilt the pan slightly and use a spoon to baste the chicken continuously with the flavored butter for the final 2 minutes of cooking.
[Pan Fried Boneless Chicken Breast Recipe →](https://chickenbreastmeals.com/pan-fried-boneless-chicken-breast/)
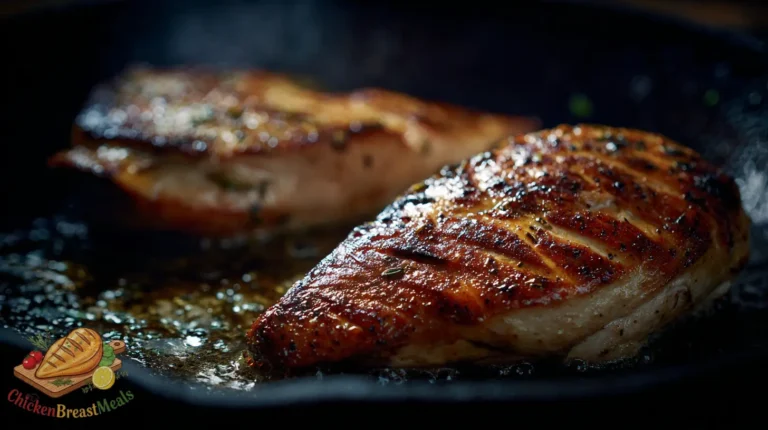
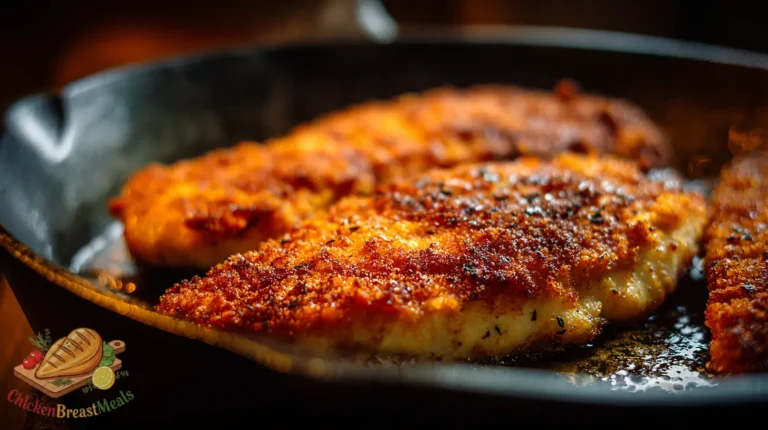
Cast Iron Skillet Chicken Breast: The Restaurant-Quality Crust
Cast iron’s exceptional heat retention properties make it the secret weapon for achieving that coveted restaurant-quality “crust” on chicken breasts. Unlike standard pans, properly preheated cast iron maintains consistent temperature even when cold chicken hits the surface, enabling the perfect Maillard reaction without temperature recovery issues. The density of cast iron also provides more even cooking, eliminating hot spots that can cause some parts of the breast to overcook while others remain underdone. Professional chefs particularly value cast iron’s ability to transition from stovetop to oven, allowing for perfect searing followed by gentle temperature-controlled finishing.
PRO TIP: For maximum crust development in cast iron, heat your pan in a 500°F oven for 15 minutes before transferring to stovetop. This creates the ideal surface temperature without the risk of hot spots that can occur when heating only on a burner.
Cast Iron Skillet Chicken Breast
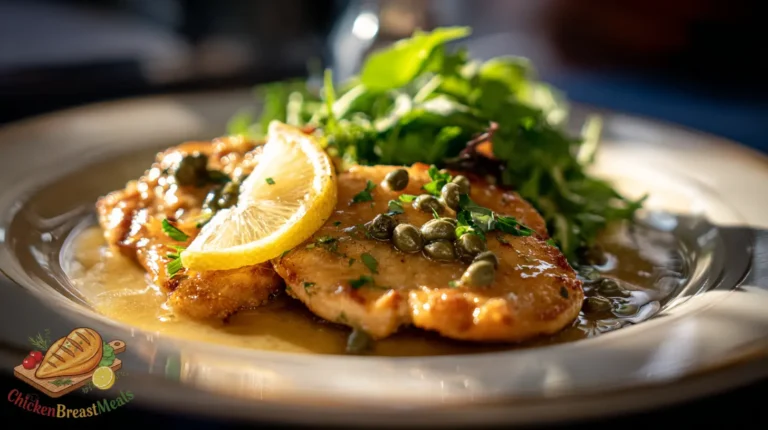
Lemon Caper Piccata Skillet Chicken: The Art of Deglazing
Piccata exemplifies the transformative potential of proper deglazing technique—turning fond (those caramelized bits on the pan bottom) into liquid gold. After removing chicken from the skillet, the addition of white wine or chicken stock creates an instantaneous reaction, lifting the concentrated flavor compounds through both physical and chemical processes. The acidic components (lemon juice and capers) accelerate this reaction while brightening the flavor profile. The final addition of cold butter through the “mounting” technique—whisking in small pieces of cold butter while off heat—creates an emulsion that transforms the sauce from thin to silky without separation, coating the chicken with a luxurious texture impossible to achieve through other cooking methods.
PRO TIP: When deglazing for piccata sauce, use wooden utensils rather than metal to scrape the fond. Metal can create tiny scratches in pans, while wood effectively lifts flavor compounds without damaging your cookware.
Lemon Caper Piccata Skillet Chicken
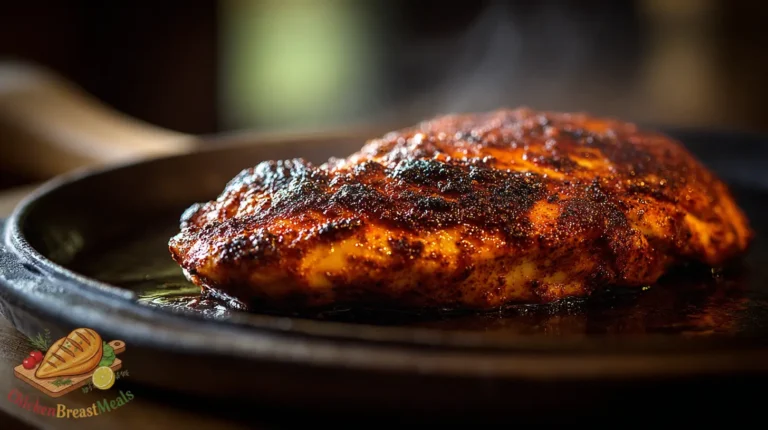
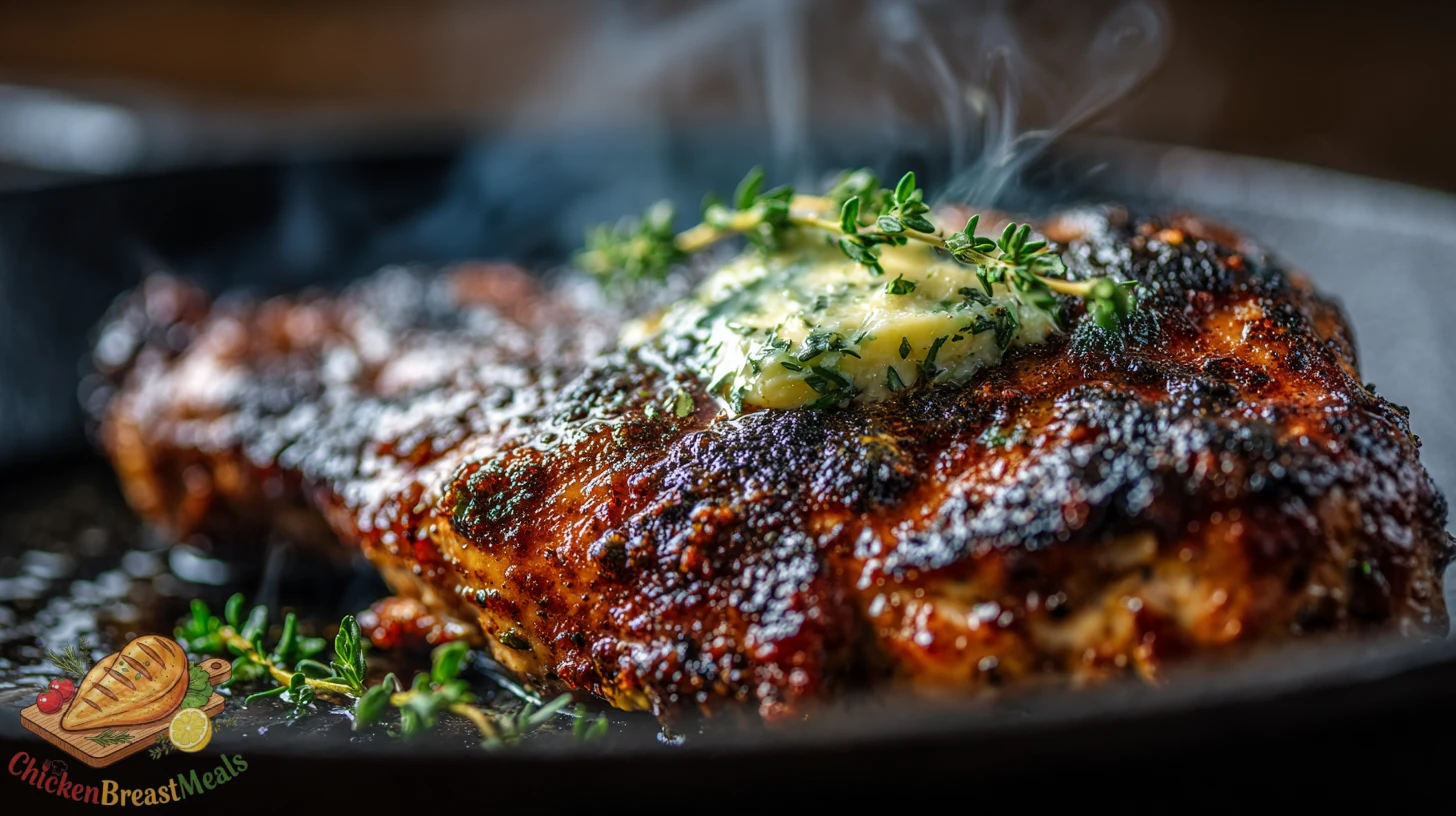
Blackened Skillet Chicken Breast: Controlling High-Heat Spice Application
Blackening represents the pinnacle of high-heat skillet cooking, requiring precise technique to avoid both underdeveloped flavor and a smoke-filled kitchen. The process relies on a specific sequence: coating chicken with melted butter before applying spices creates a medium for the spices to bloom in the intense heat. The characteristic “blackened” appearance isn’t from burning but from the controlled caramelization of the butter-spice mixture. Temperature control is paramount—the skillet should reach approximately 500°F, hot enough to create instant caramelization but not so hot that the milk solids in the butter burn and become bitter. This technique originated in Cajun cooking but has been refined to work within modern home kitchens without setting off smoke alarms.
PRO TIP: When blackening chicken, open windows and run ventilation, but also place a large bowl of white vinegar on the counter near your cooking area. The vinegar helps neutralize airborne particles that cause the strongest smoke odors.
Blackened Skillet Chicken Breast
How to Pan Fry Chicken Breast No Splatter: Clean Technique Mastery
The secret to splatter-free pan-frying lies not in gadgets but in understanding the science of moisture interaction with hot oil. Splatter occurs when water molecules rapidly expand into steam upon contact with oil significantly above water’s boiling point (212°F). Professional kitchens minimize this through a three-part approach: thoroughly patting chicken completely dry (removing surface moisture), starting with properly preheated pans (reducing cooking time), and maintaining ideal oil temperature between 350-375°F (hot enough for proper browning but not so hot that immediate and violent steam expansion occurs). This methodical approach reduces cleanup while creating a safer cooking environment, particularly important in small kitchens or when cooking for family.
PRO TIP: Apply a thin coating of kosher salt to chicken 30 minutes before cooking, then pat thoroughly dry. The salt draws internal moisture to the surface where it can be removed, creating drier exterior surfaces that significantly reduce splatter.
How to Pan Fry Chicken Breast No Splatter
Flavor Directions: Expanding Your Skillet Chicken Repertoire
Creamy Sauce Variations
The beauty of pan-fried chicken lies in its ability to serve as a foundation for luxurious sauces. These creamy variations build upon the basic deglazing technique:
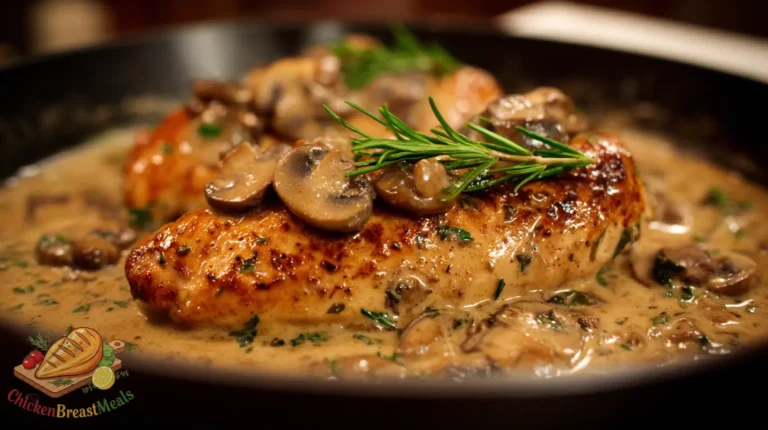
- Mushroom Skillet Chicken – Featuring caramelized mushrooms and thyme in a brandy-infused cream sauce.
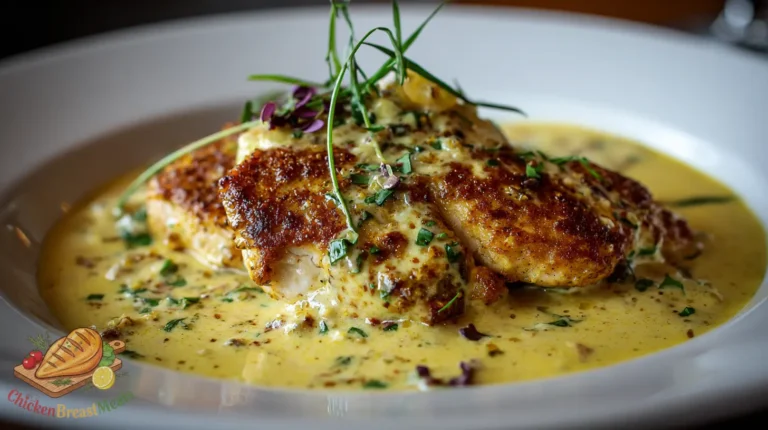
- Mustard Cream Chicken – Balancing pungent Dijon with heavy cream for a sophisticated French-inspired classic.
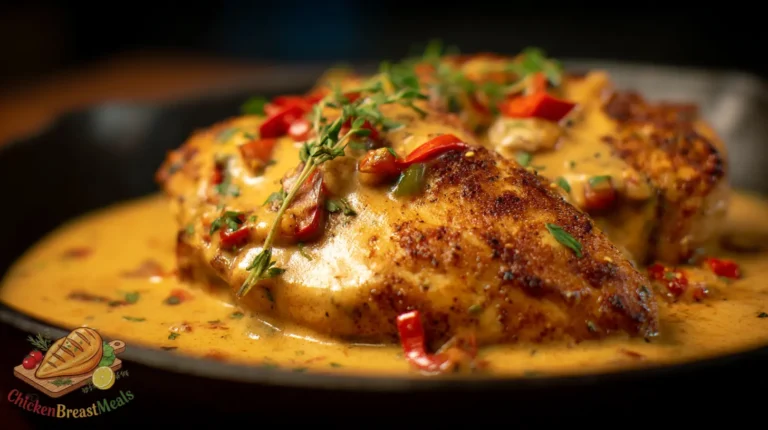
- Cajun Cream Chicken – Marrying spicy blackened seasoning with cooling cream for perfect temperature contrast.
Aromatic & Herb Foundations
These variations showcase how aromatics and fresh herbs transform a simple technique into something extraordinary:
- Garlic Butter Chicken – Employing slow-toasted garlic in browned butter for nutty depth.
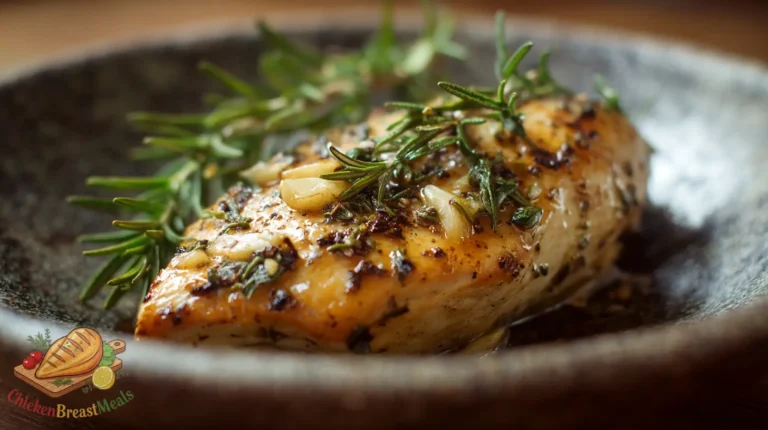
- Rosemary Garlic Chicken – Infusing oil with rosemary’s piney essence before cooking for aromatic complexity.
- Ginger Scallion Chicken – Using Asian technique to create bright, clean flavors with minimal ingredients.
Global & Sweet Flavor Profiles
Explore international flavor combinations and sweet-savory balance:
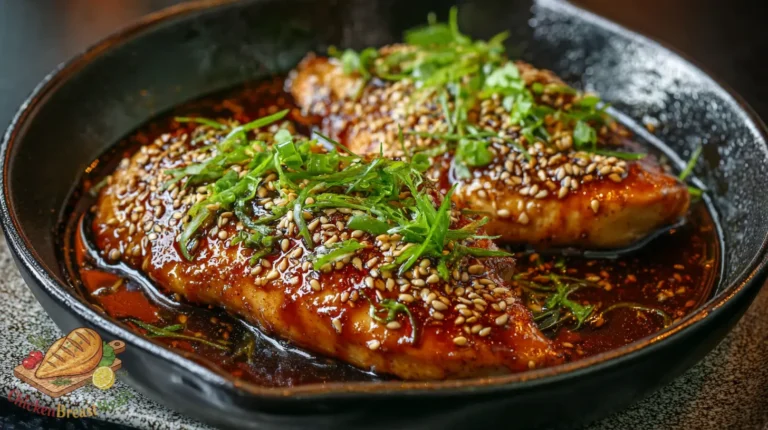
- Honey Soy Glazed Chicken – Demonstrating the reduction technique for creating glossy, flavor-concentrated glazes.
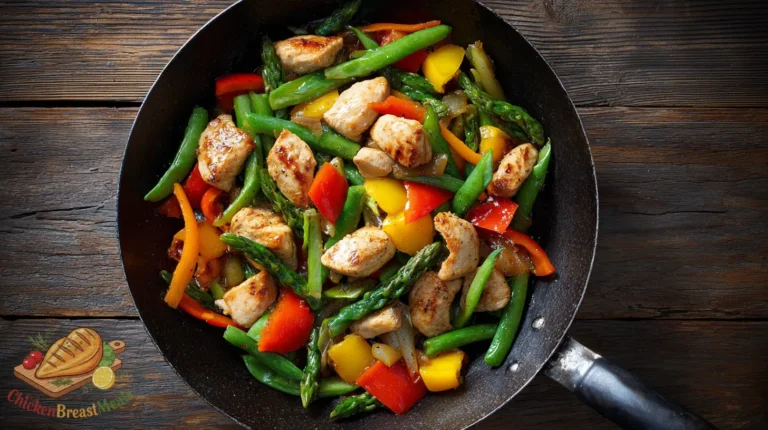
- Chicken Stir Fry Skillet – Adapting traditional wok techniques for standard kitchen equipment.
- Apple Cider Chicken – Showcasing how fruit-based reductions create complex sweet-tart sauces.
Troubleshooting & Technical FAQ: Solving Common Challenges
Why does my chicken always stick to the pan?
Chicken sticking to the pan is often misdiagnosed as an equipment problem when it’s actually a technique issue. Proteins form bonds with metal surfaces when first placed in a pan, but naturally release once properly browned through the Maillard reaction. The three most common causes of sticking are: insufficient preheating (the pan must be hot before adding oil and chicken), moving the chicken too early (resist the urge to check or move the chicken for at least 3 minutes), or insufficient fat (even non-stick pans require some oil for proper heat transfer). If your chicken consistently sticks, try the “hover hand” test—hold your palm 2-3 inches above the pan; when you feel significant heat radiating, the pan is ready for oil, then chicken. Allow the chicken to cook undisturbed until it easily releases when gently nudged with tongs.
How do I prevent my chicken from curling up in the pan?
Chicken curling during cooking results from the uneven contraction of proteins and connective tissue. The tapered edges and exposed tendons contract faster than the thicker parts of the breast, creating a cupped or curved shape that prevents even contact with the pan. Professional kitchens solve this through proper preparation: make 2-3 shallow slices through the tendon side (bottom) of the breast without cutting all the way through, or place the breast between parchment paper and pound to even thickness. For maximum flatness, you can also remove the tenderloin and cook it separately. During cooking, using a weight like a bacon press or smaller heavy pan for the first 1-2 minutes helps establish even contact until proteins begin setting.
What’s the best oil for pan frying chicken breasts?
Oil selection significantly impacts both flavor and smoke point considerations. For high-heat methods like pan-frying, choose oils with smoke points above 400°F to prevent bitter flavors and potential kitchen smoking. Refined avocado oil (smoke point 520°F) offers a neutral flavor profile ideal for letting chicken’s natural flavor shine. Clarified butter or ghee (smoke point 450°F) provides rich flavor without the burning risk of regular butter. For moderate-heat cooking, cold-pressed extra virgin olive oil can be used but carefully monitored as its smoke point varies greatly by quality (325-400°F). Avoid unrefined oils like toasted sesame or virgin coconut oil for initial searing—they’re better added at the end of cooking for flavor. The best universal recommendation for beginners is grapeseed oil, offering high smoke point (420°F) with minimal flavor interference.
Why is my chicken breast dry even though I followed timing recommendations?
Dryness despite following timing guidelines typically stems from one of four issues: First, chicken size variation—supermarket “standard” chicken breasts have increased nearly 40% in size over the past 30 years, requiring adjusted cooking times not reflected in older recipes. Second, insufficient resting—cutting into chicken immediately after cooking causes moisture loss as the proteins haven’t had time to reabsorb juices. Third, overcooking due to inaccurate temperature readings—ensure thermometer is inserted into the thickest part without touching bone or pan. Finally, quality and freshness matter—previously frozen chicken often loses moisture during thawing, starting your cooking process at a disadvantage. The solution combines proper measurement (using temperature rather than time as your doneness guide), adequate resting (5-10 minutes), and quality ingredients.
How do I know when to use high, medium, or low heat for skillet chicken?
Heat management represents the defining skill separating amateur from professional results. Use high heat (375-400°F) only for the initial sear, creating color and flavor through the Maillard reaction, typically 2-3 minutes per side. Transition to medium heat (325-350°F) for the cooking phase—hot enough to continue cooking efficiently but not so hot that the exterior burns before the interior reaches target temperature. Reserve low heat (275-300°F) for finishing thick pieces or creating sauces. Professional chefs often use the “palm test” rather than dial settings: high heat feels uncomfortable after 1 second above the pan, medium heat is uncomfortable after 3-4 seconds, and low heat is uncomfortable after 8-10 seconds. This method accommodates variations between stoves and pan materials.
Why does the coating always fall off my breaded chicken?
Breading failure typically stems from breaking the “dry-wet-dry” rule or improper technique during cooking. The scientific solution requires understanding breading as a system: the first dry layer (flour) adheres to the slightly moist chicken surface, the wet layer (egg) provides binding properties, and the final dry layer (breadcrumbs) creates texture. Skipping any layer compromises structural integrity. Additionally, three technical steps prevent separation: allow the breaded chicken to rest 15-30 minutes before cooking (allowing the coating to adhere), maintain proper oil temperature (350-375°F), and resist the urge to move the chicken frequently (each movement creates opportunities for breading to separate). Finally, proper draining technique (on a wire rack, not paper towels) prevents steam from softening the underside of your carefully created crust.
Can I make pan sauces ahead of time?
Creating pan sauces ahead presents both technical and quality challenges, but professional kitchens use specific methods to make it work. The fundamental issue is that pan sauces rely on fond (the caramelized bits left after cooking protein) for their depth of flavor. The compromise solution is creating a “master fond base” by searing chicken specifically to develop fond, deglazing with stock, reducing, and refrigerating this concentrated base. When needed, simply heat this base, add final ingredients (cream, herbs, butter), and adjust seasonings. This technique sacrifices some of the immediate vibrancy of traditional pan sauce but maintains approximately 80% of the flavor quality while significantly reducing last-minute preparation. Cream-based make-ahead sauces should be gently reheated below simmer to prevent separation, while butter-finished sauces should have cold butter pieces whisked in after reheating to restore proper texture.
How do I pan-fry chicken for meal prep without it drying out when reheated?
The key to successful chicken breast meal prep lies in strategic undercooking and proper reheating technique. For chicken that will be reheated, remove it from the pan when internal temperature reaches 155°F rather than the standard 160°F, as it will continue cooking during both the carryover period and reheating process. Cool completely before refrigerating to prevent condensation that makes reheated chicken soggy. For reheating, avoid microwaving whole breasts—instead, slice thinly against the grain and reheat gently with added moisture (a splash of chicken stock, a drizzle of olive oil, or a tablespoon of sauce). Professional meal preppers often incorporate “planned-overs” rather than leftovers: intentionally creating extra pan sauce during initial cooking, reserving it separately, and adding it during reheating to restore moisture. This technique ensures your Wednesday lunch maintains the quality of your Sunday dinner.
Taking Your Skillet Chicken Beyond the Basics
Mastering pan-fried chicken breast opens doors to countless culinary possibilities. With the foundational techniques covered in this guide, you’re equipped to create restaurant-quality meals that maximize both flavor and texture while avoiding common pitfalls.
Remember that perfect pan-fried chicken is about technique rather than complicated ingredients. Focus on temperature control, proper fond development, and resting times, and you’ll transform this everyday protein into something extraordinary.
For more specific applications of these techniques, explore our recipe collection featuring everything from 15-minute weeknight dinners to impressive date-night centerpieces—all built on the principles of proper skillet cooking.
Explore All Pan Fried Chicken Breast Recipes
-
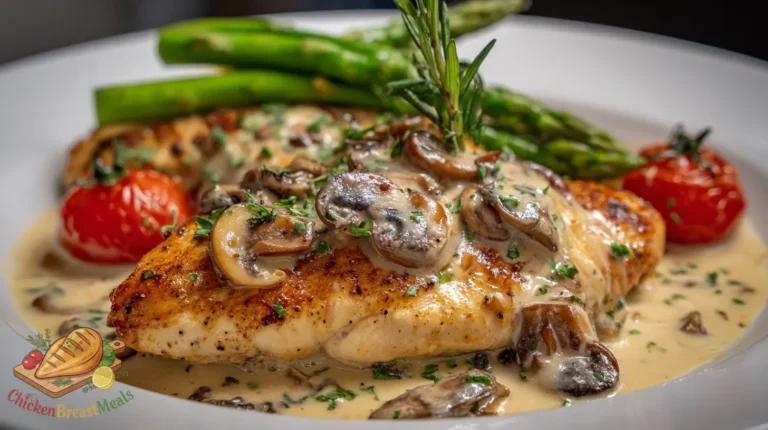
Rich Creamy Mushroom Skillet Chicken Breast (Comforting & Savory)
Tender pan seared chicken breast smothered in a rich, creamy mushroom sauce.
-
Perfect Cast Iron Skillet Chicken Breast (Restaurant-Quality Sear)
Get a perfect restaurant-quality sear with this cast iron skillet chicken breast recipe.
-
Bright Lemon Caper Piccata Skillet Chicken (Fresh & Tangy)
Classic chicken piccata made easy in a skillet with a tangy lemon caper butter sauce.
-
Bold Blackened Skillet Chicken Breast (Smoky & Flavorful)
Spicy and smoky blackened skillet chicken breast, cooked hot and fast for maximum flavor.
-
Juicy Garlic Butter Skillet Chicken Breast (Rich & Aromatic)
Juicy pan fried chicken breast basted in rich garlic butter and fresh herbs.
-
Sweet & Savory Honey Soy Skillet Chicken Breast (Quick Meal)
Sweet and salty honey soy skillet chicken breast that cooks perfectly in one pan.
-
Fast Healthy Chicken Breast Stir Fry Skillet (Light & Delicious)
Fast and healthy chicken breast stir fry made right in your skillet with fresh vegetables.
-
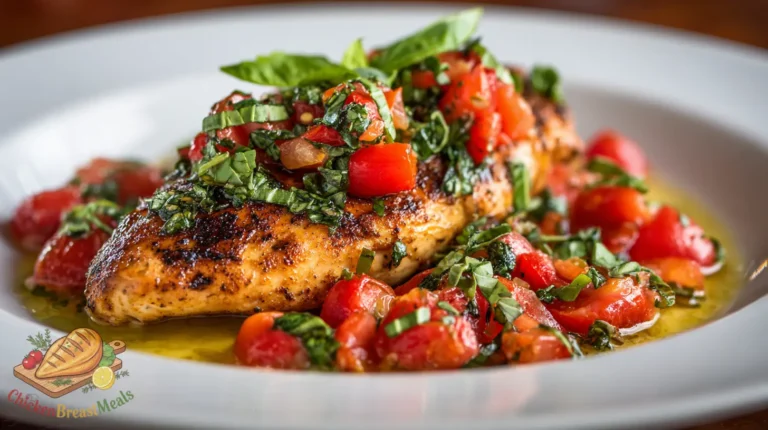
Fresh Tomato Basil Skillet Chicken Breast (Light & Flavorful)
Light and fresh tomato basil skillet chicken breast, perfect for a summer dinner.
-
Creamy Mustard Cream Skillet Chicken Breast (Rich & Tangy)
Pan seared chicken breast finished in a luscious Dijon mustard cream sauce.
-
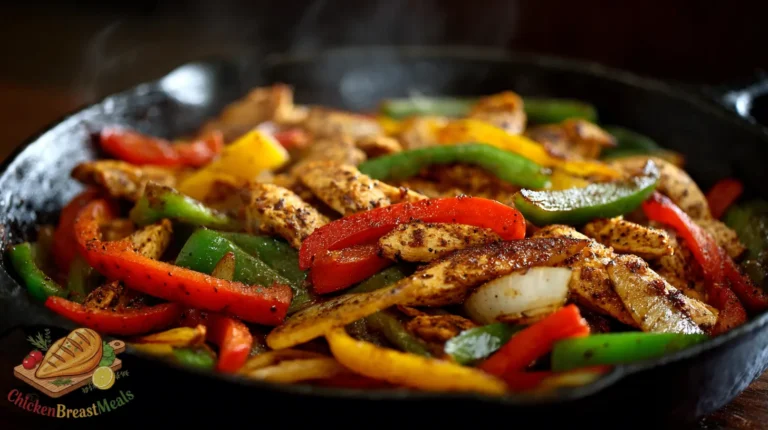
Skillet Chicken Breast Fajitas
Classic restaurant-style skillet chicken breast fajitas cooked perfectly in a pan.
-
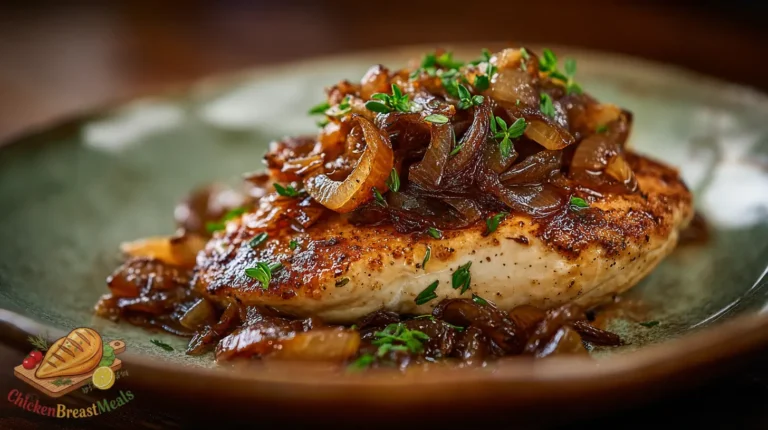
Savory Caramelized Onion Skillet Chicken (Sweet & Rich)
Savory pan fried chicken breast smothered in sweet, rich caramelized onions.
-
Elegant White Wine Sauce Skillet Chicken (Delicate & Flavorful)
Elevate your dinner with this pan seared chicken breast in a delicate white wine pan sauce.
-
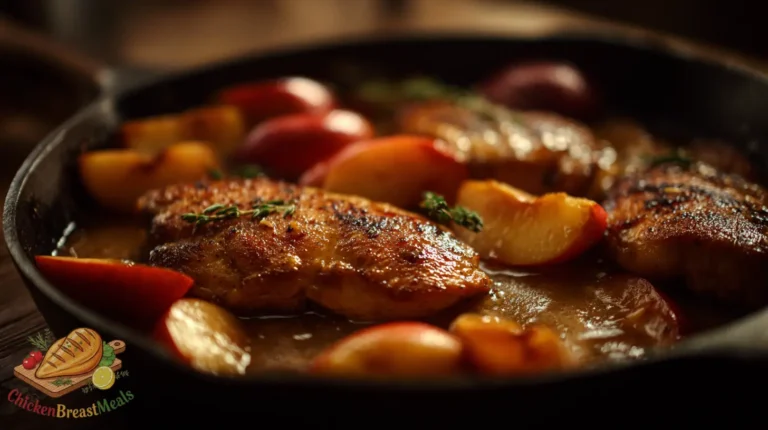
Cozy Apple Cider Skillet Chicken Breast (Sweet & Savory)
Fall-inspired pan fried apple cider skillet chicken breast with caramelized apples.
-
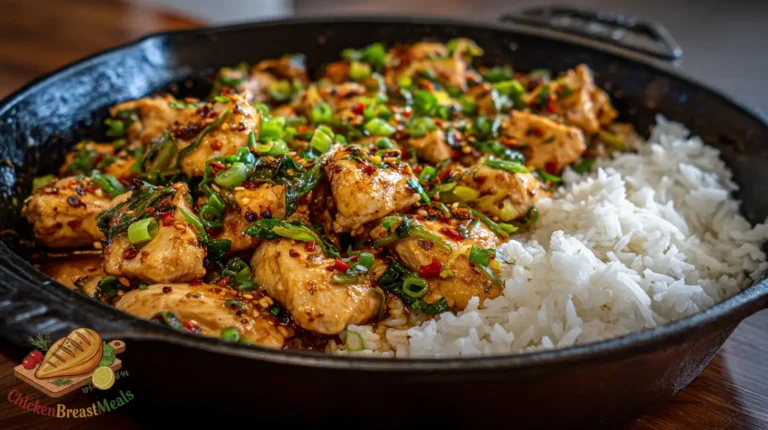
Ginger Scallion Skillet Chicken
Aromatic and fast ginger scallion skillet chicken breast, perfect over rice.
-
Easy Pesto Skillet Chicken Breast (Fresh & Flavorful)
Simple 3-ingredient pesto skillet chicken breast pan fried to juicy perfection.
-
Creamy Cajun Cream Skillet Chicken Breast (Spicy & Rich)
Spicy pan fried chicken breast smothered in a rich, Louisiana-style cajun cream sauce.
-
Fragrant Rosemary Garlic Skillet Chicken (Savory & Herb-Infused)
Earthy and fragrant rosemary garlic skillet chicken breast cooked in olive oil and butter.
-
How to Pan Fry Chicken Breast Without Oil Splatter (Clean & Easy Method)
Learn the best tips and tricks on how to pan fry chicken breast without making a mess.
-
Quick & Juicy Pan Fried Boneless Chicken Breast Recipe (Easy Skillet)
A quick and juicy pan fried boneless chicken breast recipe perfect for busy weeknights.
-
Foolproof Crispy Pan Fried Chicken Breast (Golden & Juicy)
Master the art of crispy pan fried chicken breast with this simple, foolproof recipe.